Apple Photo Book Printing
Apple Photos, iPhoto, and Aperture printing for photography and design professionals

If you are a professional looking to print Apple Photo Books since Apple has ceased printing, PhotoBooks.Pro offers high end printing and service just for you. Matching the print specifications utilized by Apple, we produce high quality photo books that feel like the books you've printed for years.
Legacy Apple Photo Project Printing
While Apple has ceased printing their own photo books, PhotoBooks.Pro can still print projects created in Apple Photos, iPhoto, and Aperture. With PhotoBooks.Pro's you can customize your photo books size and choose between hardcover or softcover with an amazing pricing. Just follow these simple steps to get started.
Apple Aperture® Photo Project Ordering
- Finalize your photo book project in Aperture
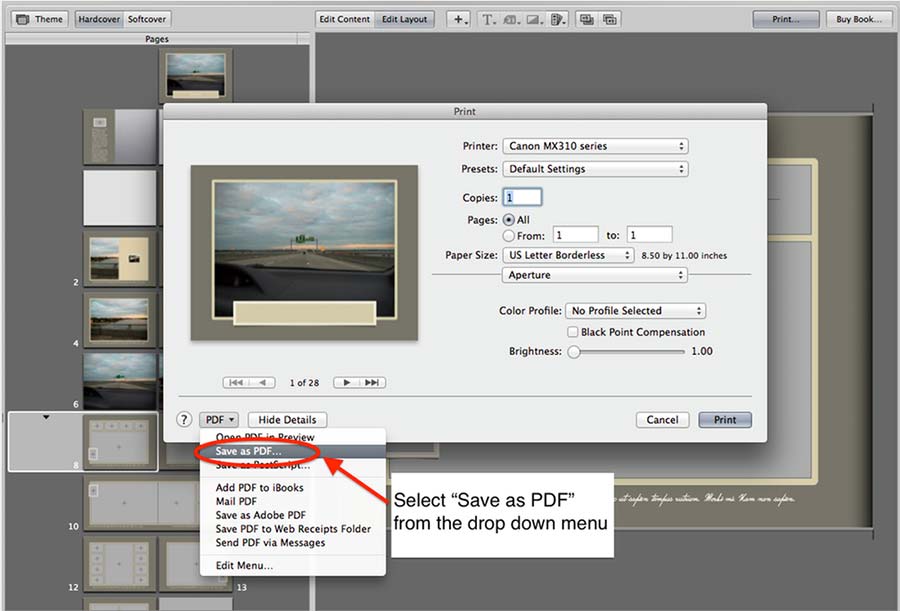
- Click Print from the top right of the window » Select Save as PDF within the drop down menu at the bottom left » Name your file and click Save
- Upload your PDF to PhotoBooks.Pro and order your photo book
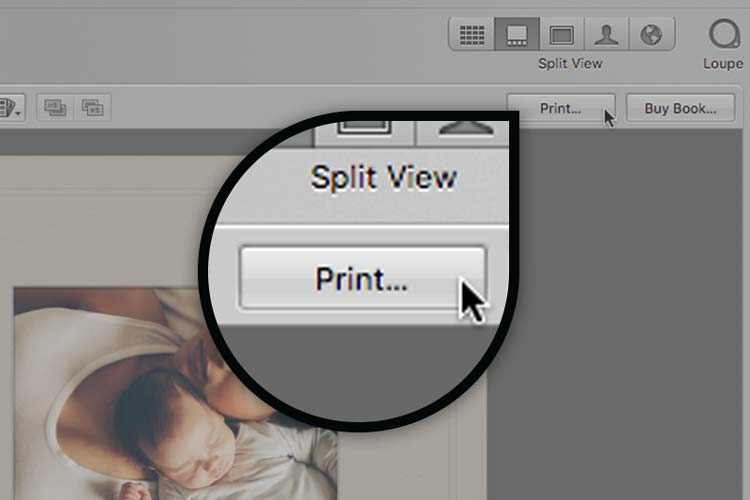
Click Print from the top right of the window
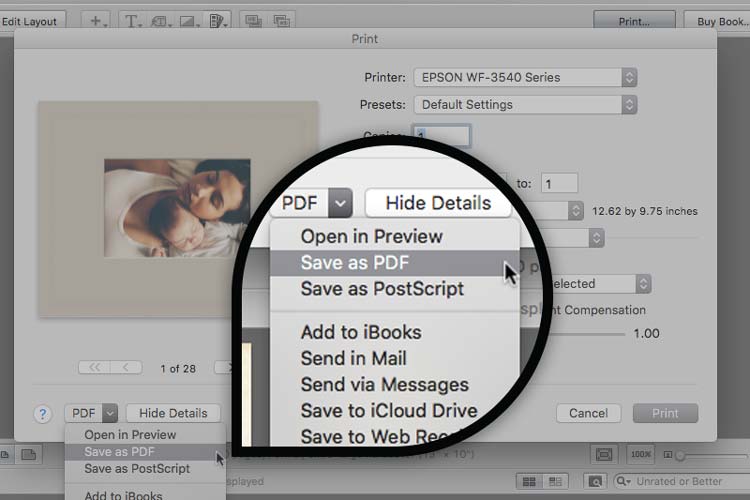
Select Save as PDF within the drop down menu at the bottom left
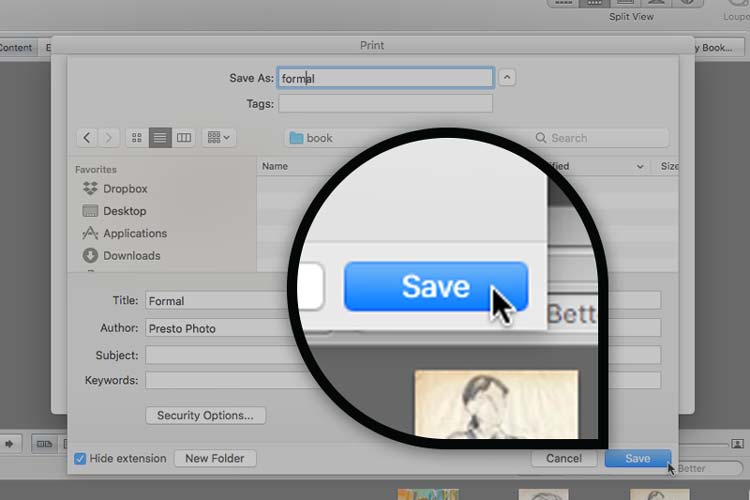
Name your file and click Save
Supported Program Versions:
- Aperture 3
Apple Photos Project Ordering
- Finalize your photo book project in Photos
-
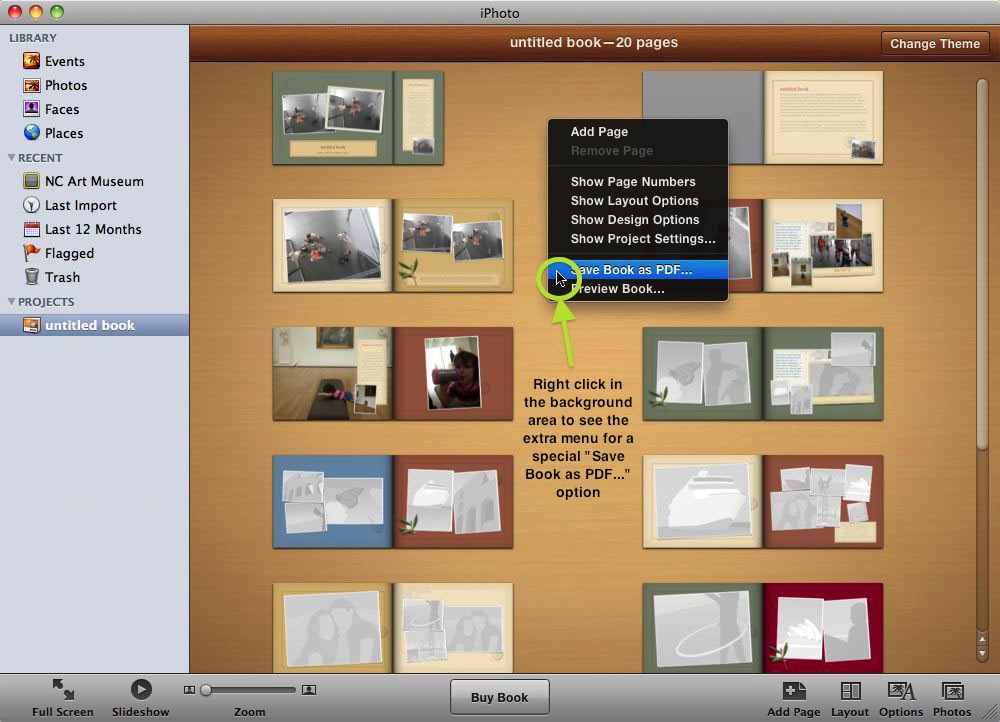
From within your project, press the option key and click the Buy Book button in the top right corner
 Optionally, hold the control key and click on the gray background to select Save Book as PDF... from the dropdown options

- Upload your PDF to PhotoBooks.Pro and order your photo book
As of macOS 10.14 Mojave, you cannot edit Photos® projects that you have already started or previously completed projects.
Supported Program Versions:
- Photos 4
- Photos 3
- Photos 2
- Photos 1
Apple iPhoto® Project Ordering
- Finalize your photo book project in iPhoto
-
From within your project, press the option key and click on the Buy Book option in the center of the window to the bottom
Optionally, hold the control key and click the orange background of the window to select Save Book as PDF... from the options
- Upload your PDF to PhotoBooks.Pro and order your photo book
Supported Program Versions:
- iPhoto '11 (9.0)
- iPhoto '09 (8.0)
- iPhoto '08 (7.0)
- iPhoto '06 (6.0)
Ready to print your Apple Photo Book PDF?
Create New Books in Apple Photos
Download the Presto Photo macOS app for a new way to make Apple Photo Books with our new extension for Apple Photos. Use customizable templates and create new Apple Photo Books with your photos library, just like your used to. Available for macOS 10.13 and above.

What Apple Photo Books do you print?
We print our photo books to meet Apple's photo book specifications as closely as we can. The result is a photo book that feels right at home with your other Apple photo books, with more options to select from than ever provided before.
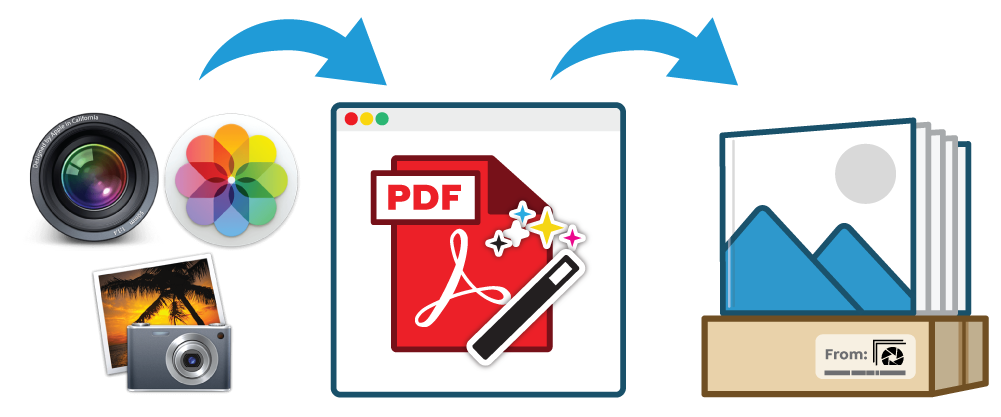
- Export a PDF from Aperture®, iPhoto®, Photos
- Upload the book to PhotoBooks.Pro
- Choose your options and place your order
PhotoBooks.Pro can print Apple Photo Books from many different Apple photo editing programs:
| Apple | PhotoBooks.Pro | |
|---|---|---|
Print Photo Books from a PDF? |
No | Yes |
Print Photo Books made in Aperture? |
No | Yes |
Print Photo Books made in iPhoto? |
No | Yes |
Print Print Photo Books made in Apple Photos? |
No | Yes |
Where are our Apple Photo Books Printed?
PhotoBooks.Pro has partnered up with a large printing partner to create high quality books that are comparable to Apple style photo books. If you're looking for a great Apple Photo Book printing choice, we got you covered, cover to cover.
Not a Professional Photographer or Designer?
For non-commercial services with the same quality, visit our Presto Photo Apple Photo Book Printing page!
They also offer the Presto Photo Templates App for creating new Apple Photo Books if you are on macOS Mojave 10.14. It's available in the macOS App Store for free. If you create a photo book with the Presto Photo Templates App and still want to use PhotoBooks.Pro, you can easily upload the PDF file to PhotoBooks.Pro and purchase it here.
Go to Presto PhotoApple Photo Book FAQs
Almost, but discerning eyes might notice some slight differences: our crop line is more aggressive and there may be some small quality differences, which depend on personal preferences. We do take great pride in the books we produce, and we offer many more options for your book as well as a lower cost to you. Read the full review from Fixthephoto.com
Currently we offer our dust jackets with 11x8.5 and 13x10 Hardcovers, though our books do not come with a jacket by default. For 11x8.5 you can select the dust jacket option shown during checkout to receive a jacket with your book. For 13x10, to ensure your book includes a dust jacket, you'll need to request one in the order comments when checking out for now, though we should have that option available when checking out soon!
Yup. From the Web store for your book, click on the “Layout” button underneath the cover image. Once this page loads be sure to check the box for “Show Crop Guides” and take into consideration the crop guides for your project size. With most Apple books this will be the red crop guide. Anything under that guide is subject to being trimmed during production, so be sure to keep any important elements (such as marriage proposals or little Johnny’s eyes) out of the red or say goodbye!
For some programs, the spine text you use will be imported, however Apple has made the decision to not include the full dimension cover when you save out your PDF for uploading to another site with Photos. This means they include the front and back covers in your PDF, but none of the spine content that you may have created for your book. We do not have any control over the Spine Text uploading with your Apple Photos PDF since it was Apple's decision to not include it.
There is hope though! If your spine text is not included in your Apple PDF, we do offer a Spine Text tool after uploading your book that will allow you to add your own! Once you’ve uploaded your book in Step 1, follow the steps below:
- In Step 2 scroll to the box labeled "Cover Text & Colors", just underneath the cover preview.
- Click on the "None" that is next to Spine Text and enter whatever text you'd like in either the Top or Bottom Spine Text boxes. The text will show as a Preview when you click off the editors.
- When you're happy with the text, click "Update Cover" at the bottom of the page and the page will refresh showing your Spine Text on the cover.
- If you're happy with the preview then you're all set! Otherwise, you're free to edit (and edit again) as much as you need! Just remember to click "Update Cover" when you make any changes so that they are saved.
Absolutely! We love helping Apple customers print their photo books and don’t limit them to only 100 pages. Some stories need a little more space! Once you’ve created your books it’s easy to combine the books on your computer, simply follow the steps below:
- Create your books and save them following the steps for iPhoto, Aperture, or Photos
- Open all parts of your iPhoto book in Preview
- Turn on the Thumbnail view in each Preview window by selecting View > Thumbnails
- Drag the thumbnail of the second PDF on top of the first and release it when the first highlights
- Enjoy your over 100 page iPhoto book!
While your book is lookin' good, by default text is usually too close to the edge page/cover, which can result in important things being trimmed. It is fixable though!
For Aperture:
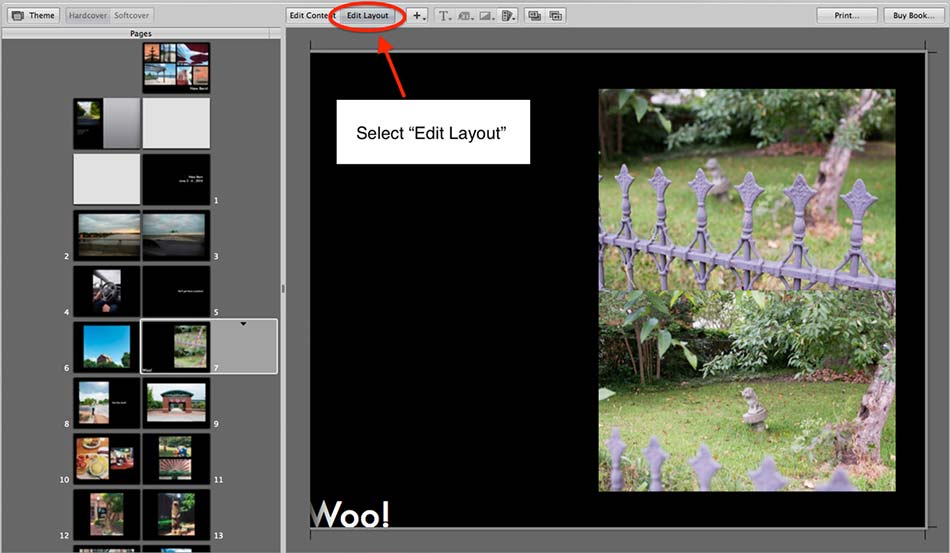
Step 1
Click Edit Layout and select the item you'd like to change
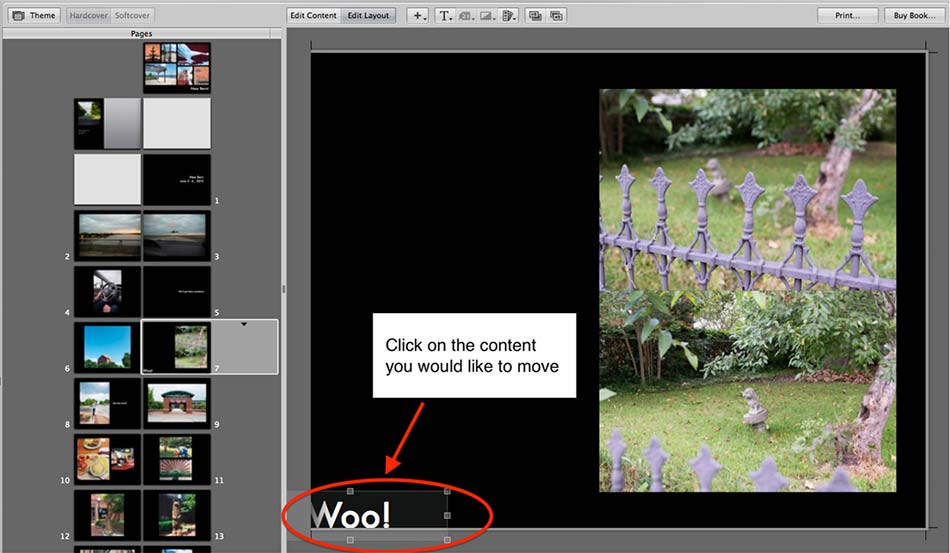
Step 2
Use the square handles to move the text boxes towards the center of the page and adjust the sizing
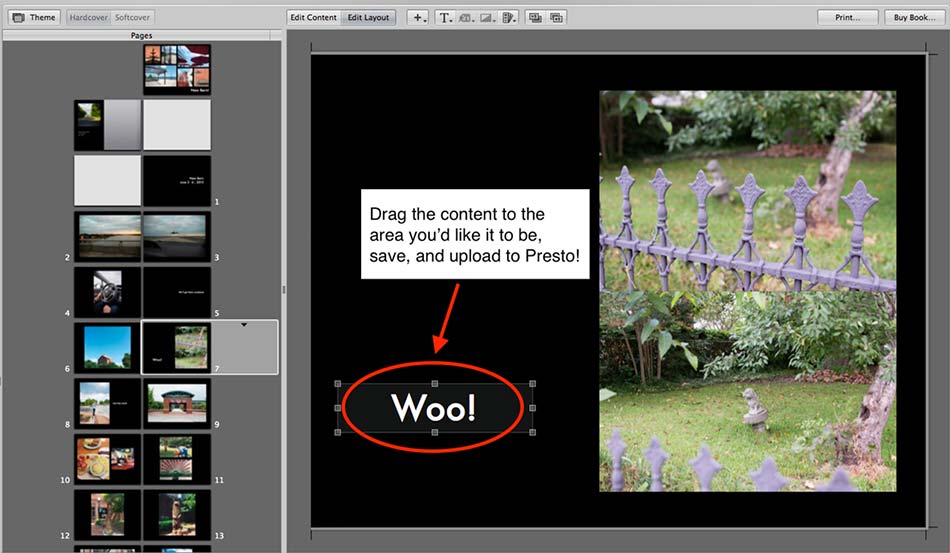
Step 3
Make sure that your cover and interior pages follow our Crop and Bleed guidelines for the best results!
iPhoto & Photos Users: These programs have a lot less control over the layout and other aspects of your project. The best way to adjust the layout in these books is by changing the template or tweaking how the images are laid out in the book. If you're worried don't hesitate to reach out after you've uploaded the file!
So many things. There can be white borders added to the pages and cover, your dust flaps could be included in the interior, and your order might be delayed by going into checking since we want to make sure you see any potential issues that we can catch!
Aperture users: Make sure you use the magical instructions for saving your file!!! Please do NOT use the File>>Save as>>PDF method as it will not give you the correct output.
PhotoBooks.Pro to the rescue! Some Aperture sizes are not able to be saved with the steps above because of their settings. We've got two fix options for you right here below, along with some step-by-step visual directions!
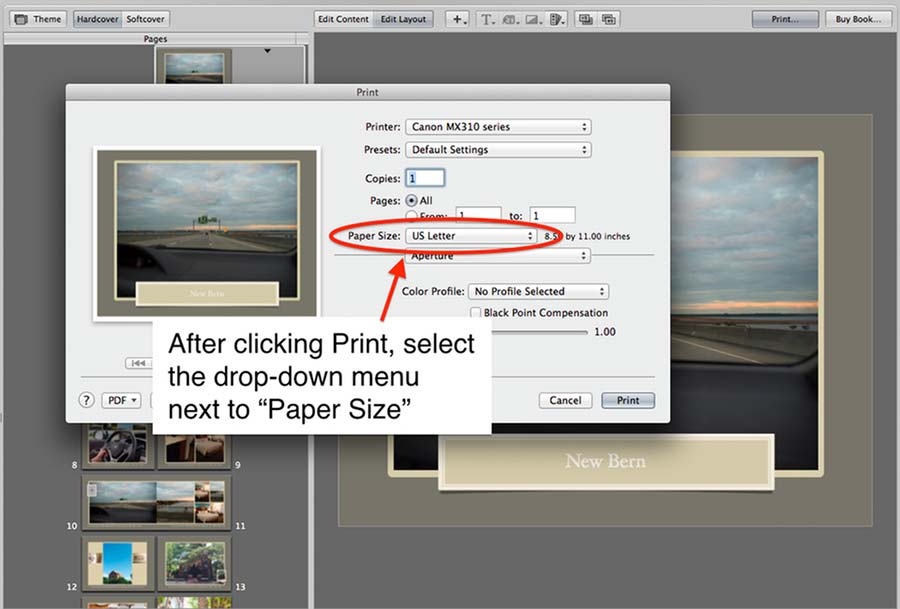
Step 1
Click "Print" in the upper right corner
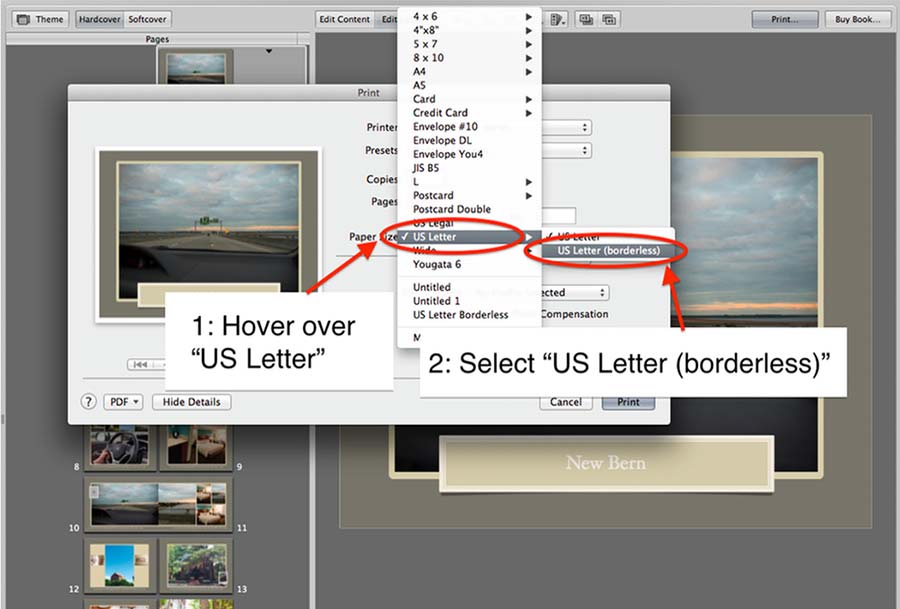
Step 2
Click the menu next to Paper Size and hover over US Letter

Step 3
Choose "US Letter Borderless"
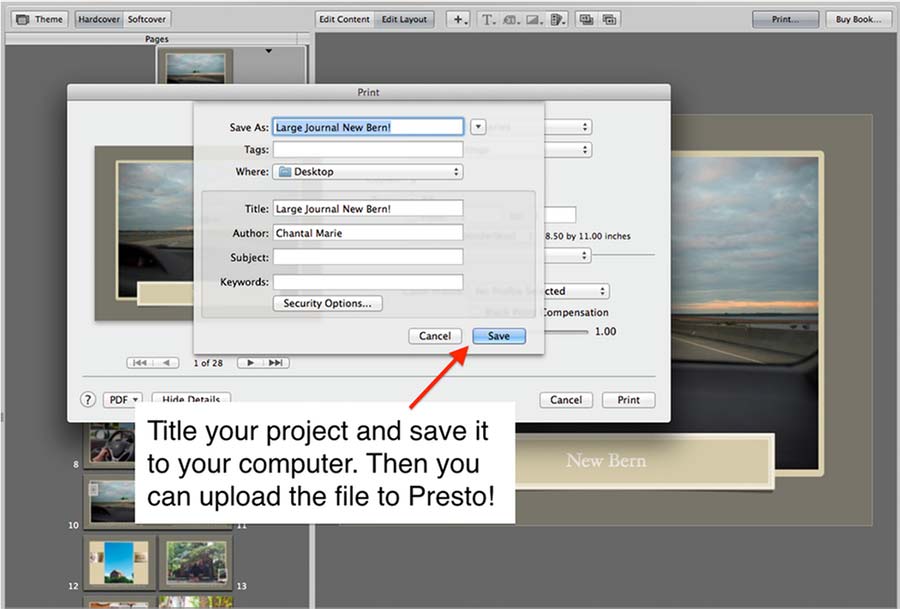
Step 4
Select PDF and then click "Save as PDF". Upload your newly fixed file over the old version, or as a new project here: PhotoBooks.Pro
If you're still having troubles, the steps below should definitely fix you right up!
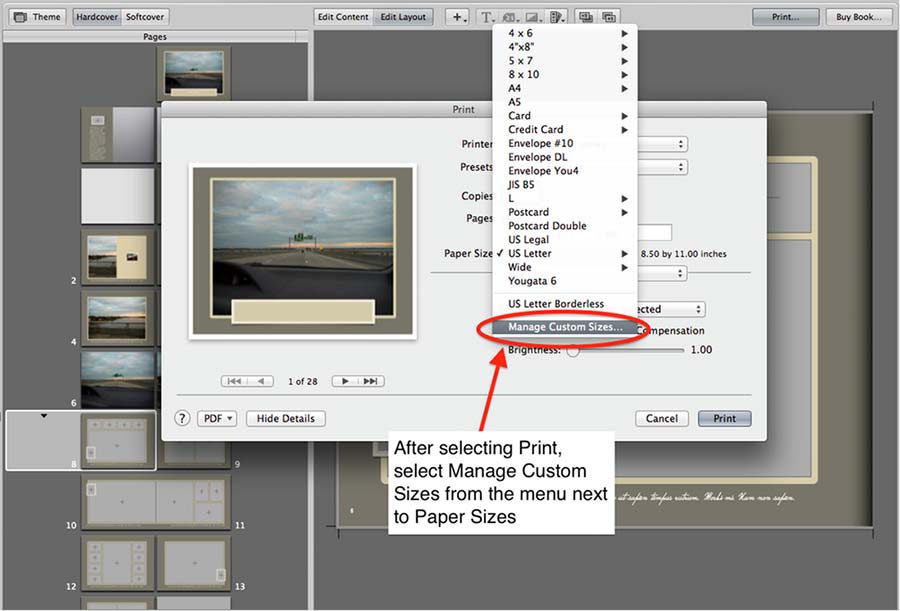
Step 1
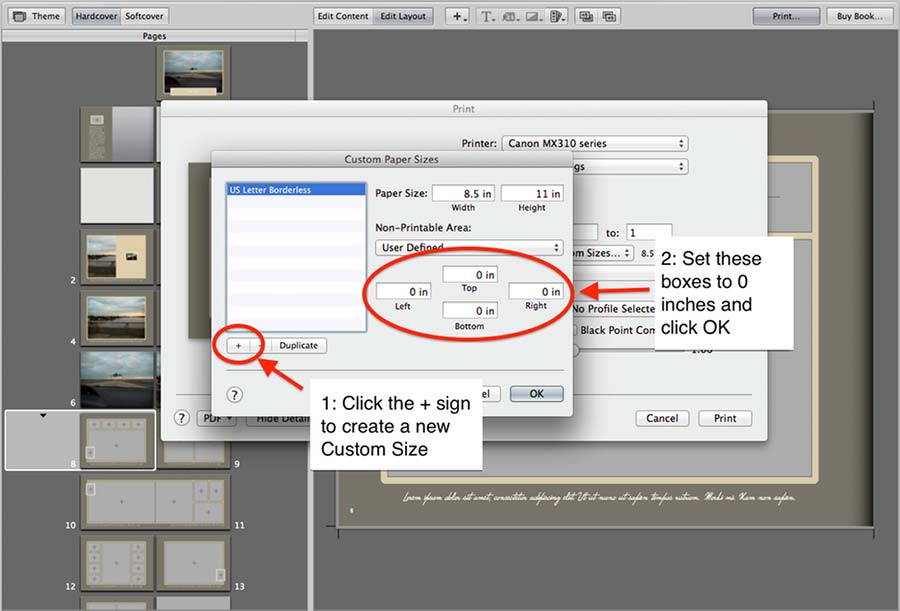
Step 2
Step 3

Step 4
- Click "Print" in the upper right corner
- Click the menu next to Paper Size and select "Manage Custom Sizes"
- In the new dialog box, click the + sign
- Under "User Defined" erase the numbers in all of the four boxes and click OK.
- Do not change the page size in this section
- Select PDF and then click "Save as PDF"
- Upload your newly fixed file over the old version, or as a new project here: PhotoBooks.Pro
- Enjoy that beautiful, borderless, soon-to-be book!
Chances are your book may have been saved improperly. We actually have handy examples of how to save your iPhoto, Aperture, and Photos book for printing with us. When your book is both saved and uploaded correctly, the flaps should not show in your book. However if you’ve tried and tried and still can’t get the flying monkeys to go away, just click your heels three times and we’ll do our best to help. Or you can just contact us.
Definitely! We actually recommend it for the most part, as they can be right at that crop guide that makes them fully or only partially disappear in production. See the steps to remove them below:
For Aperture:

Step 1
Within your project click on "Book Actions"

Step 2
Select the Page Numbers options
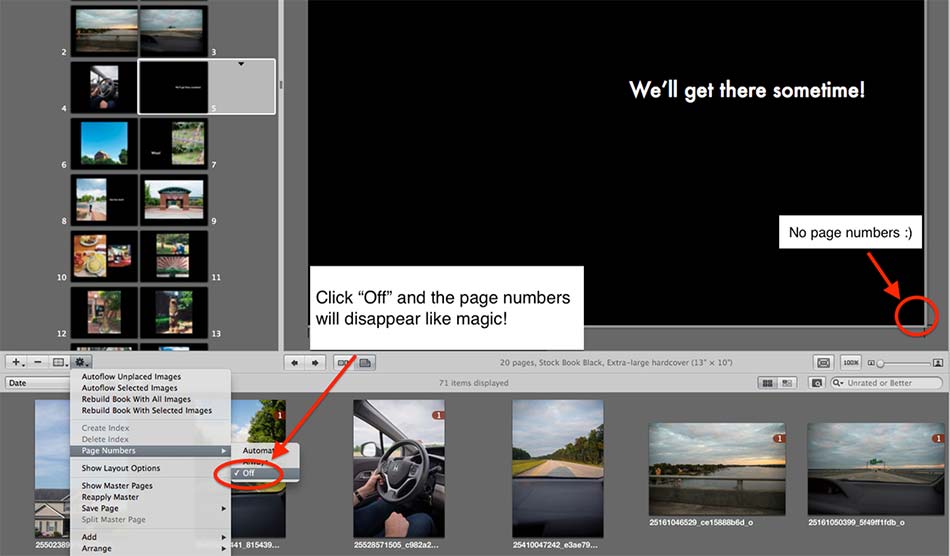
Step 3
Click "Off" to remove all page numbers. Sayonara page numbers!
For iPhoto:
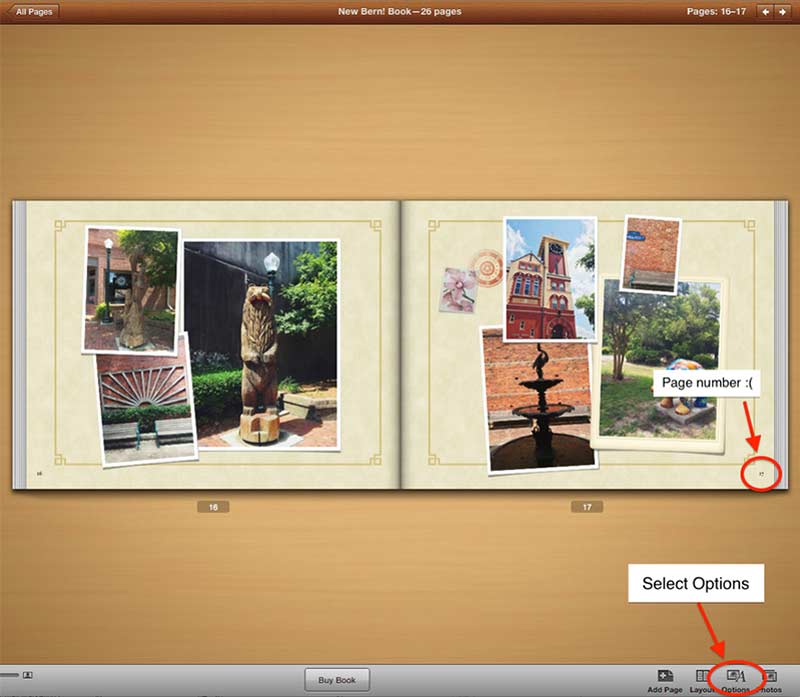
Step 1
Within your project select "Options" at the bottom right
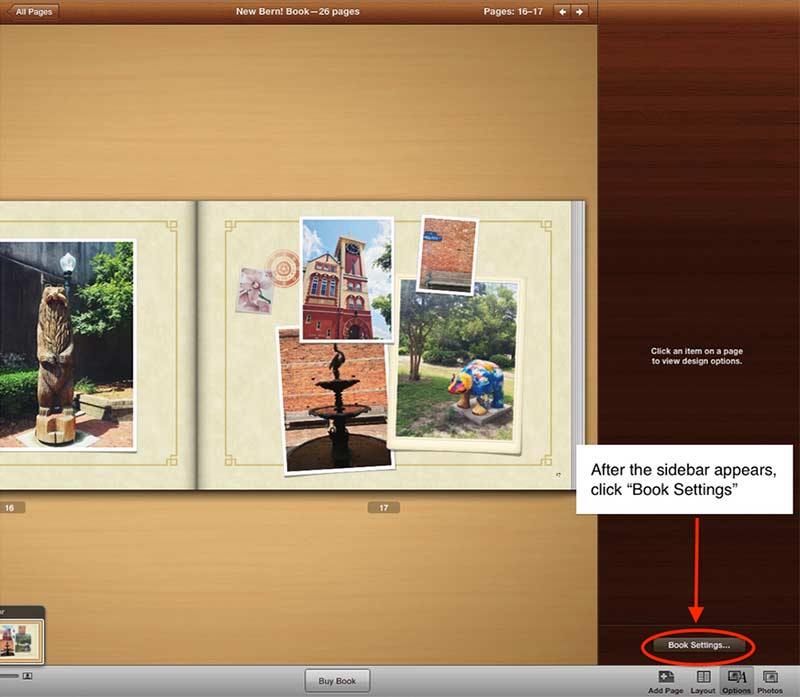
Step 2
After the sidebar appears, click on "Book Settings"
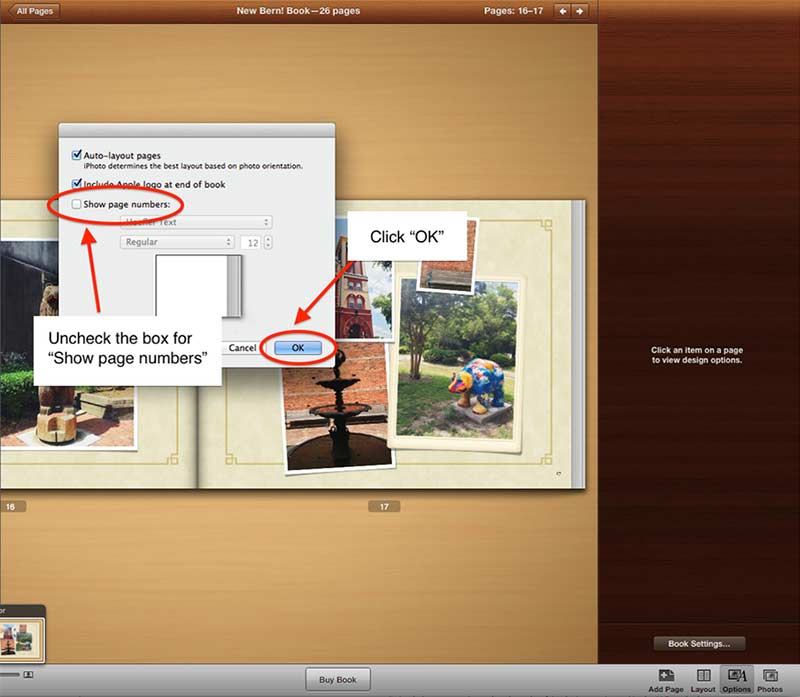
Step 3
Uncheck the box for "Show page numbers" and then click "OK".
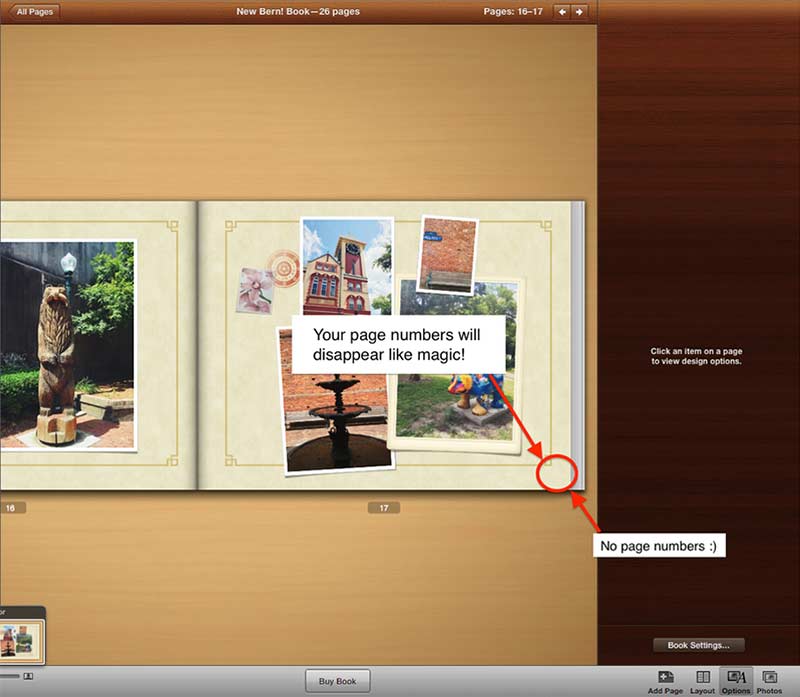
Step 4
Voila! No more page numbers.
Absolutely! With PhotoBooks.Pro there is no need to make a new book for each size you'd like. One size can (mostly) fit all! Any additional sizes that are available will show in your book's Webstore, which is found after you click Buy Now in the Uploader!
It's easy to get started
Upload your BookPhotoBooks.Pro provides templates commensurate to Apple's templates in aid of creating books similar to what you've been making with Apple over the years. Apple Photos, iPhoto®, & Aperture® are registered trademarks of Apple, Inc, registered in the U.S. and other countries. Our Photo Books are in no way endorsed by Apple Inc, but we have tirelessly worked to match the style of your existing books.